Sunday, 8 April 2012

Counter attack in Normandy.

Counter attack in Normandy.

It's Easter Sunday, so what better way to spend the afternoon than with a quick solo game of BCK!

A British Battalion with armour support attempts to hold the fictional French town of Sainte Claire from counter attack by a German SS Kampfgruppe. The scenario is counter attack from the Blitzkrieg Commander rulebook.

OOB is as follows:

British

CO - CV9
HQ - CV 8
5 x Infantry (Regulars)
2 x Infantry (Regulars) w Piat
1 x Vickers MG
1 x 6 Pdr Anti Tank
1 x Honey (Recce)
1 x Sherman 75mm
1 x Sherman Firefly

German

CO - CV9
HQ - CV 8
5 x Infantry (Heer)
1 x Infantry (Heer) w Panzerschreck
2 x MG42
4 x Infantry (Waffen SS)
3 x STUG III
1 x Panther


An overview of the table. The British deploy in the 1/3rd of the table at the bottom of the picture with the Germans coming on from the far edge in the first turn.


Deployed. The British deploy trying to cover the likely approaches for the Germans. The British Infantry in and around the main town itself and near the woods to the west, whilst their armour deploys to the east.

Turn 1

The Germans get off to a rip roaring start with their armour coming on to the east of the main road. They approach the edge of the cornfield gingerly probing for the British and then await further instructions. Meanwhile the Heer moves up towards the woods west of the road whilst the SS moves up in support of the Panzers.


The British tank commander hears the roar of German engines and enthusiastically orders his tanks forward for a better view. In the meantime the Honey zooms up to the woods in the hope of getting a look at the German advance.

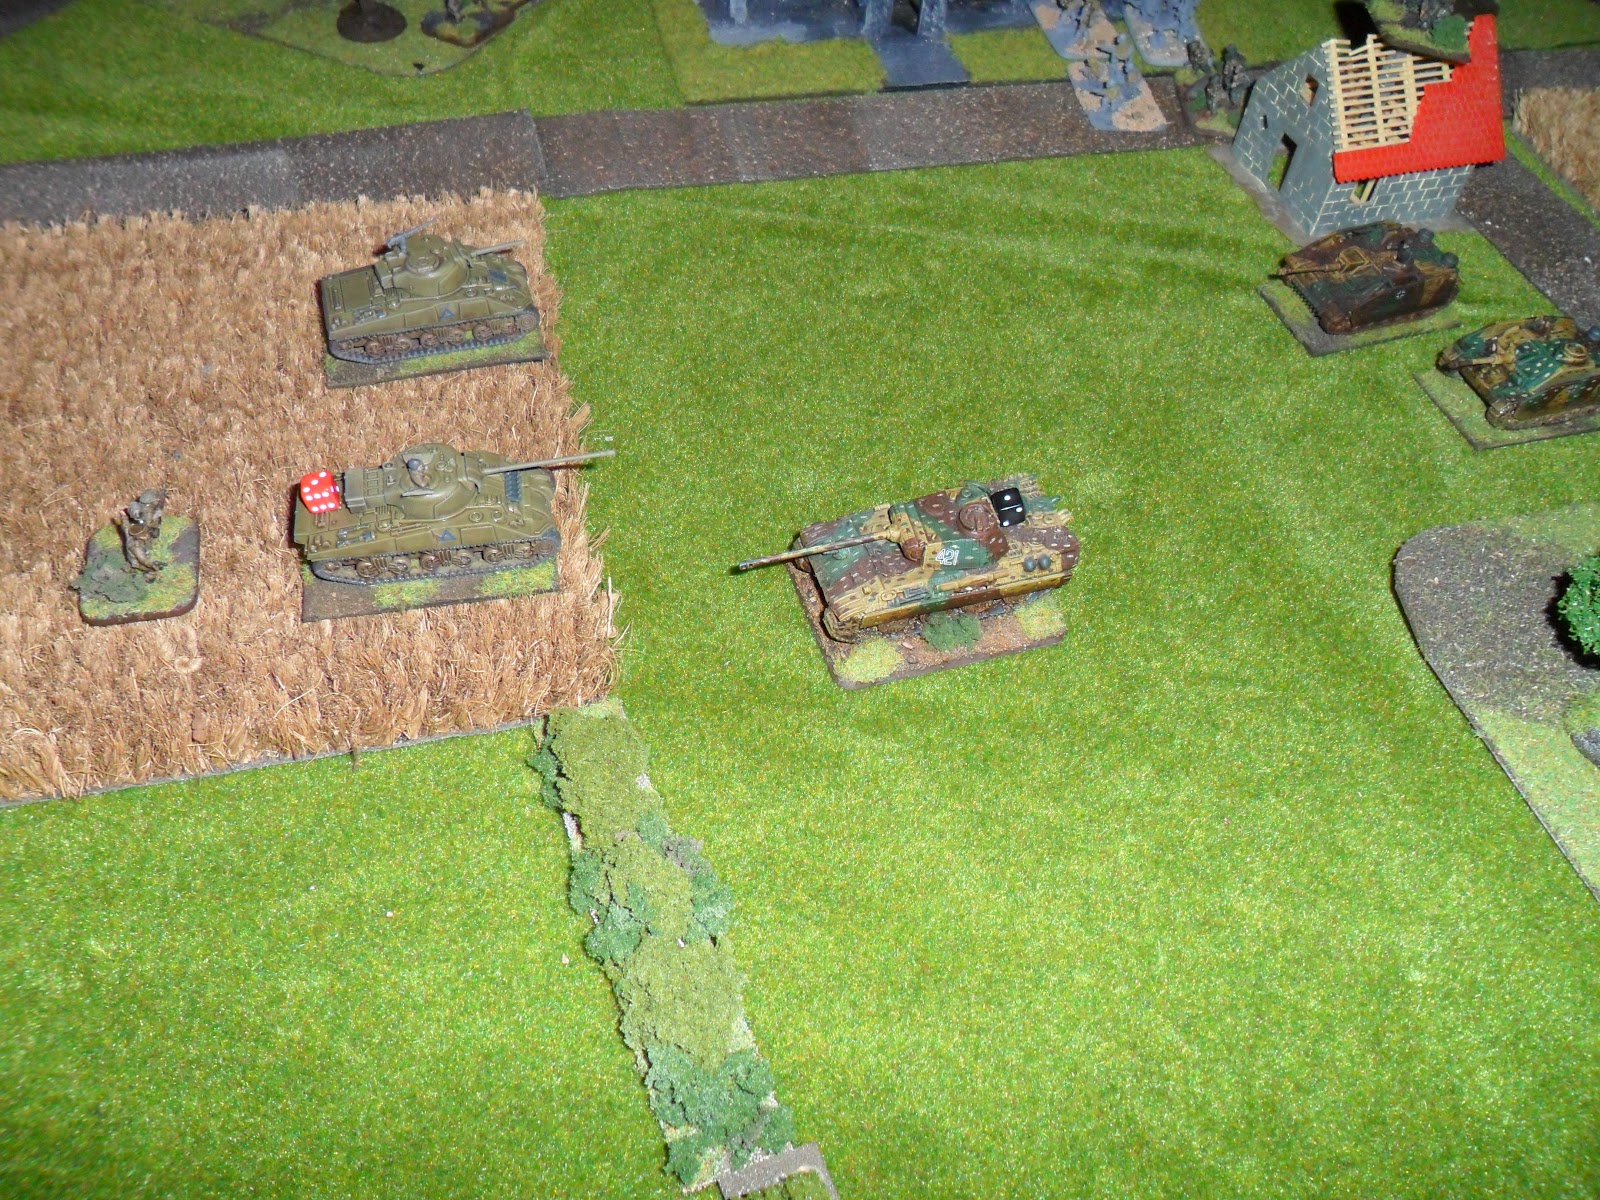
At the edge of the Cornfield the British tank HQ spots the approaching Stugs (the Panther being safely out of sight behind the woods) and orders his tanks to open fire. The volume of fire however is disappointing causing only a single hit on one of the approaching assault guns.

In the meantime several Platoons of British infantry advance in the the woods west of the town and take up positions at the edge to await jerry! 


Turn 2

The German Panzer HQ is clearly spooked by the incoming fire from the British armour and promptly fails to order his armour to do anything whilst he reassesses the situation. The german Heer however continue their advance to the west of the town and the SS push past their confused comrades in the Panzers and head towards the church. The British tanks, spotting the SS, open fire with their MG's, but only score a single hit. The SS shrug this off and push further up the road.


The British Honey unit attempts to radio HQ with information but thanks to some gremlins in the machinery HQ fails to get the message. Not that this matters to the tank commander who mange to get off 2 successful founds of firing, knocking out one of the Stugs units. First blood to the British!

The Vickers gun in the town opens fire on the SS and successfully suppresses a platoon.


Turn 3.

German armour moves up into a a better firing position and engages the British, a successful round of firing manages to suppress the Firefly unit, but the commanders attempt to keep up the pressure results in disaster as the Panzer units ignore their orders to systemically destroy the British tanks and instead charge out towards them. The German armour is suddenly dangerously exposed!


The infantry fares a little better advancing towards the town. The Heer units round the back of the church are opportunistically engaged by British infantry in the woods who manage to suppress one of the infantry platoons, the German attempt to return fire manages in turn suppress one of the British Platoons. The SS on the road to the front of the church manages to suppress another one of the British platoons in the woods.


The unsuppressed British Sherman platoon uses its initiative to open fire at the Panther unit in the hope of suppressing it. This will probably be the only way of saving their own bacon. Despite scoring a hit the Panther unit fails to be intimidated by the puny fire of the 75mm guns.

The British Tank HQ, instead of calmly ordering his men to keep firing, enters a bind state of panic and blunders! His ability to command is severely comprised unit the end of the next turn. Needless to say his attempt to order his tanks any further fails.


The infantry in the woods open fire and promptly wipe out a Heer platoon and the 6pdr by the crossroads manages to suppress one of the remaining Stug units. Further attempts to open fire however are unsuccessful.


Turn 4.

The German armour now have the British tanks at their mercy and needless to say they don’t show any! The Panther and unsuppressed Stugg units destroy the Firefly and the Sherman 75mm units with 2 rounds of deadly fire. Both units them move up towards the edge of the town. A British infantry Platoon in one of the buildings attempts to attack the Panther with opportunity fire from a PIAT but scores only a single hit.


The German infantry pours fire into the British in the woods. The Heer managing to drive an already suppressed unit back a whopping 18cm, which needless to say destroys it, whilst moving 2 of their own platoons up to try and flank the woods. The SS efforts are even more sucessful, destroying one platoon and driving another back into the middle of the woods.

With 4 units gone, a breakpoint of only 6 and the right flank gone things look very bad for the British!


The British turn however sees a staggeringly rugged display of tenacity as they attempt to salvage what they can can from their situation. The CO in the woods managing to successfully order the British infantry in and around the woods to open fire no less than 4 times!

The result of this heroic action is the destruction of 2 Heer units by the infantry in the woods and a further Platoon being destroyed and another being driven back by a British platoon located in a building behind the woods, which quickly halts any German ideas about flanking the British position. the vickers MG manages to suppress (but not quite destroy) a unit of the SS on the road and the 6pdr drives one of the Stugs back to the edge of the cornfield.

The Germans are now only 2 away from their own break point!

Turn 5

The Panther unit opens fire on the infantry platoon that attempted to ambush it last turn, however it fails to score a single hit. In the Meantime the unsuppressed Stug moves up to to it's side. The British platoon again attempts to fire with the PIAT using opportunity fire but fails to hit the Stug. The Panther and Stug units now open fire on the 6pdr platoon, which has it's flank exposed to them. Needless to say it's swiftly destroyed.


The German infantry now has its own moment of glory with 3 successful command rolls. The Heer open fires on the remaining British Platoons in the woods and manages The wipe out 2 of them. In the Meantime the 3 unsuppressed SS units move into the the woods and destroy the platoon they managed to successfully drive back earlier.


The British have now lost 7 platoons and proceed to fail their check at the start of their turn. With only a handful of men and no armour remaining they withdraw to lick their wounds.


Thursday, 29 March 2012

Plastic Solider Company 15mm M4A4 review Part 1


Today, only 3 weeks after I ordered them, my M4A4 Sherman/Firefly boxed set finally turned up.

I’ve assembled 2 of PSC previous kits, the Stug III and the SdKfz 251 Ausf D, but this is the first time that I’ve assembled any of their Shermans, so I’m looking forward to seeing how they turn out.
 My first impression of them is very positive indeed. I’ve always like the PSC kits and this certainly don’t give me any reason to change my mind. The detail seems crisp and sharp. There is also noticeably less flash present than on some of their earlier kits. The MG42 in the SdKfz 251 Ausf D kit for example had quite a bit of fiddly flash to remove, the 30cal on this however is flash free.


The instructions are the normal ‘exploded’ style diagrams that PSC normally put in their kits. The one in this however seems to only focus on the Firefly, but it doesn’t look to difficult to work out how to assemble it as a 75mm Sherman instead.

One thing I did notice was that the sprue must have been rejigged since the color coded guide to parts was produced as some of the parts on the diagram don’t correspond to their place on the actual sprue. Thankfully it’s only a few pieces and it’s easy enough to find their new home.

The upper and lower hull come in two parts and there is a different upper hull for the M4A4 and the Firefly, the difference between the 2 seems negligible to me but I’m sure one of the rivet counters out there will be able to enlighten me.
One trick I picked up from another blog is, before putting these 2 together, to fill up the hollow empty space in the lower hull using filler to give the models some extra weight. I’m going to try this out here for the first time. The filler I use is available from poundland and whilst I wouldn’t use it on my walls, it’s perfect for wargaming purposes.


The upper and lower half of the hull put together.


 The turret fully assembled.

 
 The Tracks. Those of you who have put together PSC kits before may well know that these can be rather fiddly, but they are the only part of the kit that doesn't go together like a dream.

 The finished product. Overall I'm very impressed, the detail is excellent and the kit took me only about 25 minutes to put together. I was watching Game of Thrones at the same time as assembling it so had I been fully concentrating on it it may well have been even quicker.

The M4A4 next to a Battlefront M1A1 76MM for comparison purposes. I'm afraid I don't have any Battlefront M4A4's to compare it to.

The M4A4 seems a little smaller as I'm sure you can see, though I'm not sure if thats correct or not.

 A 2nd model, this time assembled as a Firefly. Just as easy to put together and again looks very nice indeed.
 The M4A4 and the Firefly together.


Finally the 2 PSC models next to the Battlefront M1A1.

Next stage is to paint them which hopefully I will be detailing in part 2 of this review over over this weekend.

Tuesday, 14 February 2012

SAGA!

Over the last few weeks my imagination has been well and truly captured by Gripping Beast's new skirmish rules Saga.

Having played my 5th game last night (of which I've won 2) I have to say I'm well and truly hooked. For those of you who don't know about Saga, it's a skirmish game set in the Dark Ages with 4 factions. The Vikings, The Welsh, The Anglo Danes and the Normans. More factions are due soon, and I even got to play against one last night as my fellow club member John is acting as a play tester for Gripping Beast.

The basic forces are essentially identical, what gives each faction it's flavor is a series of abilities that are activated with special dice rolled at the start of the turn.

My Faction (The Welsh) are all about using terrain and hit and run tactics. Their abilities allow them to nimbly bounce over terrain like it wasn't there whilst hampering my opponents movement and running away before he gets a chance to hit me back.

I've no photos of any games I've played sofar, but I do intend to take some soon. What I can say is that this is an excellent set of rules that are easy to learn and full of flavor and tactical subtlety.

I aim to get my warband painted over the next month. I'll try to blog my progress here!

Sunday, 22 January 2012

Quest for a quickshade alternative.

Well last week my loyal can of army painter quickshade final died. It been on it's last legs for a while now, a film seemed to form over the top of the shade after about 24 hours of removing the last one. I must have lost about half the tin this way.

Before parting with £20 for a new tin I thought about alternatives. After all quickshade really is only woodstain at the end of the day, so could a cheaper tin from a DIY store do the same job?

After some google research I discovered that the general consensus online is that the stuff to be using is an American brand called Miniwax, sadly unavailable in the UK. However a few people where singing the praises of B&Q's own brand of interior Rosewood varnish, which was only £5.99 a tin. I popped down to my local branch and bought some last weekend.

The first thing I would say is that it looks rather different in the tin to quickshare. It's almost grey in appearance. I dug around in my bits box and found some old LOTR Orcs for practice. I sprayed them a nice Panzer Grey and brushed them with various thicknesses of  varnish.


After a few practice tries, I worked out the following technique.

  • Take a small amount of varnish from the tin with your brush.
  • Thin it slightly on a pallet, I find the correct ratio is about 4 parts Varnish to 1 part water for a clean finish, however you may wish to experiment. I found that it had a dirtier finish if applied straight from the tin, but if you are shading a model with a dirty appliance, such as an orc or undead model this may be ideal for you.
  • Slap it onto your model, don't worry at this stage about getting too much on.
  • Leave it for about 1 minute, then using an empty brush collect up the pools of varnish that have accumulated. At this stage the varnish will still appear grey, this will turn brown later on as the varnish dries.
  • The varnish is dry to the touch in about 30-40 minutes.
  • Zap the model with your favorite matt varnish.
Here is a infantry stand shaded using B&Q varnish and the results are excellent. It's certainly a recommend purchase.

Vinyl Roads update

Well the vinyl roads have come on very nicely indeed. After painting up all the pieces I cut from the tiles I set them out on a table to see how they looked. I have to say I'm really rather pleased with the way they have turned out.

Here are a couple of pictures. This isn't from a game, I've place miniatures on the board it's just to illustrate their appearance.

British Infantry straddles the road outside of a small town.


German Infantry approach the town with armour supporting their flank.

I must have a good 15 feet of roads from the 2 packs of tiles I bought. Total cost including sand and paint was £4!

I even have a few tiles left over. My next project is to try and make rivers from them.

Friday, 6 January 2012

Cheap Roads from Vinyl Tiles.


Roads are a necessity for anyone gaming WW2 and if you're gaming in NW Europe you need lots of them!

I've been looking for a source of cheapish roads for a while. I've experimented with foam and felt but never been happy with the results. I tried making a few pieces from Plasticard and whilst they looked good they where unfortunately only good for flat tables, quite expensive at £1.50 for an A4 sheet, and it's a bugger to cut the curves.

Today however I think I may have stumbled on a solution when I wandered into the wargamers treasure trove that is Poundland. They sell Vinyl floor tiles in packs for 4 for (you guessed it) £1, the tiles are 30cm square. These are cheap, flexible, a doodle to cut with household scissors and have an adhesive backing so you don't even have to worry about covering them in glue. I bought 2 packs to experiment with.

After this I popped over the road to Wilkinsons to buy some more supplies. First I picked up some of their bird sand from the pet section. This is always a good buy and only costs £1 for a Kilo of the stuff. Considering that GW's modeling sand is now £5 for 100 grams , the wilkos alternative is quite literally 1\50th the price of GW's. Doesn't that make your head spin?

Wilkos Acrylics
Also I looked at their art section. They do some useful and cheap acrylic paints that are good for terrain. A 75ml tube of their 'burnt umber' paint is 90 pence and a almost exact match for GW's Scorched Brown. This would be an excellent base color for my roads. I also grabbed a tube of their 'burnt sienna' color which I thought looked a good terracotta color for roofs on model buildings. I've not tried it yet but I'll probably post something about it in the future when I do.

After cutting the tiles into pieces I removed the backing and covered them in sand. It adhered nicely, thought there where a few small bald patches that I touched up later with PVA. Once painted though this should seal the sand nicely.
A few of the pieces after they had been sanded.


One of the pieces after being painted.


Tomorrow I shall drybrush and flock the test pieces and post the reults!

Friday, 30 December 2011

Plastic Soldier Company

Well I must have been a good boy in 2011 as Father Christmas brought me my first 2 boxes from The Plastic Soldier company. I've been following them online for some time and have been meaning to buy something from them for ages. Well I got one box of German Stug III Ausf F8/Gand another of SdKfz 251 Ausf D Halftrack.

I've put one of each together sofar. The assembly process is a little fiddly for the Stug, especially for the tracks, but overall isn't too difficult. Each one took me about 20 minutes (or one episode of American Dad which I was watching on TV as I put them together). I'll try to take some step by step photos when I stick the rest together. There are plenty of options for the Stug, you can make up about 4 variants, so its good for both the Mid and Late war player.

At about £16 a box (or less if you shop on-line) these are quite the bargain.

Below are some comparison shots, with the PSC model next to their Battlefront equivalent. As you can see in terms of size both models are near identical. I'll take some more shots when painted but I think they should be virtually indistinguishable.


 The SdKfz 251. PSC on the left.

 The Stug. PSC on the left.